Pages

Wednesday, April 30, 2014

Paint it Black: Skirt to Dress

It's April 30th, and this should be my last post for this month's refashion theme, "Paint it black." Today is Wednesday and Saturday was WAW's Legacy. I wrote about what that is on this post. It was just as hard as I thought it would be.
This dress, I thought would be easy. I've seen people do it on legitimate crafting blogs and it doesn't look difficult. Take a long skirt; hike it up over your boobs, add a belt, and maybe do something for sleeves...and there, now it's a dress. Here's what I started with:
That was hanging in a closet at my parents' house. It was my favorite skirt when I was about 20; goth and walking around tryin' to look like Steve Nicks.
A continuous source of inspiration
As you can see, the elastic waistband has disintegrated with time. Which is crazy, because it's not like it's been hanging there for 30 years! It wasn't that long ago that I was buying witchy clothes at Hot Tpoic!

I was able to open up the seam and pull out that old elastic, seen in the picture. How cool is the pointy hem on that skirt? I believe they call that a handkerchief hem. Yup, I just checked. I have one in my blogger profile pic.
Anyway, I thought that I could add some sort of string and fashion some kind of simple halter or shoulder straps to keep that skirt boob high.

Lucky for me, I had that great velvet ribbon from my sewing supplies haul a couple weeks ago. Using a safety pin, I worked it through the holes that I pulled the elastic out of.
It just wasn't working. I experimented with different ways of using that ribbon, but none were viable options. I figured that I better just replace the elastic.

Sigh. So, I worked my elastic through, as you can see. You can't freakin' miss it, because the skirt is sheer and I only had white elastic. Oh, then, I'll just move on.
With the elastic, the skirt would have held itself up, but I wanted to do more than just restore the skirt to it's original state. I wanted straps, but wasn't sure what to use. I decided to add loops in the front and back of the skirt's waist line, like internal belt loops. Then I could add change-able materials for straps. You follow?

Yeah, the picture is bad, it's always dark when I do this stuff. But, do you see the little loops made from thin ribbon pinned on there?
That is a fabric scrap from the heap. This was excess fabric from that green tulle skirt that I did last month. All I did was take that piece of fabric and tie it to the two loops in the front of the dress, thus creating a halter. Ta da! Then I gave this thing a waist by adding a belt. The results were...
Meh. It's really not something that I would wear. I messed with this thing all Saturday and never found that it looked all that great. Here are a few pics:

Sure, it's a nice picture. I'm not gonna post the bad ones. I got a few decent shots of me looking somewhat nice, but overall, I'm not in love with the outfit.
While taking this picture, I also experimented with another skirt, using the no sew method. First it was like this:
It's a size 10 thrift score buy for $2. Something about the turquoise roses made it appealingly ugly to me. Here's what I did with this one:
I pulled it up over a tank top, pinned it closer around the boob area and hid that safety pin with a black clip on earring (sorry it's not visible). I'm sure that this outfit looks lovely, but I'm just not feeling it. It's not me and I don't like it. I have another idea for it, of course.

Thanks, photo editor! It looks less nice in person. Thanks for looking at this post, I totally plan on my next refashion to be much better. 

Monday, April 28, 2014

Thrift Hoard: Lots of things

I've purchased lots of things. What I haven't done is list them, or even blog about them in thrift share posts. I blame this on a few factors. Slightly nicer weather says, "why sit on your couch and type? Maybe you should go out just for a minute. Where? Just hit up a thrift store." So, I do that. Also, I'm on school vacation this week; meaning last week may have been spent avoiding reselling with the claim that I've got this whole week to catch up. So, I'll just get started.
I bought some things that were useful and necessary. My lovely turquoise-fridge-matching beaters stopped working, in the middle of a frosting recipe.
Goodnight, sweet prince
 I was able to pick up a replacement for $2. It works and it is vintage. But avocado, although lovely is no turquoise!

I do get somewhat excited for cheaply purchased storage solutions, like this one.
Look at all those compartments. When you turn it around, the other side has more compartments. Double compartments! Guess what I'll use it for?
Buttons, probably. But, I was attempting to make a digression from my purchase of an organizer to another purchase of sewing notions that require organization. Look at all that ribbon. I attempted to corral the stuff with the use of clothespins, but that's not really working for me. Anyway, I heard a tip off that Savers had a bunch of fabric and other supplies. I got a couple pieces of fabric and a few plastic bags that appeared to have cool stuff inside.


I don't think I should have brought home a bunch of tiny treasures. That may have been a bad choice. For one, I spent an entire Sunday morning goofing off while exploring my haul. While there was plenty of useful little supplies to be found, I don't have time to use them all. When I did go to do a project, last week, I got a little overwhelmed by the multitude of items in my stash. I've got so much DIY stuff, that I can't possibly DIMyself. I'm just going to show off some highlights...
That ribbon tho
Ooh...that's some gorgeous velvet ribbon that could really fancy some shit up. I want to try and make some straps for an otherwise strapless dress with that. Maybe necklaces? Beautiful stuff, but I've got no ideas.
Lovely spring green/yellow lace. For...?

 That appears to be a sequined skull cap. Fancy yarmulke? 


Several velvet butterflies, all smooshed. 
Bad pic quality, but these are some of the things made by the previous owner from velvet ribbon. I could do that!
More cool ribbon! Seriously, I don't need this!
 
Cool hat pin. 
 
Small beads (bad picture, so sorry). In little vials! I don't know that I'll ever use little beads, but look at those awesome vials! 
 
Same story with this. Adorable aqua octagon shaped container. Yeah, like I need tacks, brads, beads, and little flower-like things. I like the little box, though. 


Cute little tin that once held typewriter ribbon. This came with pin backs in it! Make brooches all day!
Seriously, I've got to do some stash busting soon. I got some merchandise to. This post is too damn long, so just a couple pics.

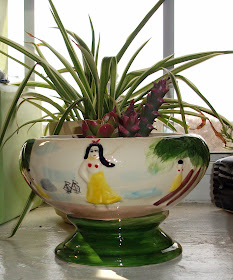
That is one of those cool bowls you get Polynesian drinks in when you go to Asian restaurants. I'm describing it because the pictures all came out kinda sucky and you might be like, "dude wtf is that?" I was attempting to show how cute this thing looks as a planter as well as a vessel for booze. I never see these things in thrift stores, but I was excited to pay $2 for this one. I'll list it, when I get some decent shots.

This awesome dress was $6. Someone buy it! I don't exactly know who the customer for this item is, but surely some fancy lady will fancy it. Fringe and sequin dress on Etsy
Oh, man, this is the longest post ever. Or maybe it's just dragging. Still here? Well, I just wanna show you this cute nice luggage haul I brought home last week.
It wasn't a great steal. Altogether, it totaled about $13, so it's not bad, either. Those hard case blues are in pretty good condition and that red bag is just sweet. I'll get to listing them...
Linking up with whomever shall have me. Like Sir Thrift A Lot.

Tuesday, April 22, 2014

Paint it Black: Indecisive Dress

One of the reasons my projects end up taking longer to complete than they should is my inability to make decisions. I have an abundance of materials and scraps and ideas, so I think that sometimes my brain gets all jammed trying to make things "just right." Like, I have a lot of vintage ribbon, and buttons, and novelty appliques...I don't want to waste these precious notions on a failed project. Or what if I use up something, then decide I should've used it for something else. That kinda thinking really stops up the works, know what I mean.
That's why I became interested in doing a refashion with a brooch. Meaning; use a brooch to gather up material, thus making an article of clothing fit. On a side note, can we discuss for a moment how oddly the word "brooch" is spelled? Since when do two o's make a long vowel sound? Every time I type it, I want to say it with an "oooh." I digress. Oh, by the way, it got cold last week. Those cold days gave me the chance to use this thick, sack of a dress:
I guess that I just had a good feeling about this thing, and a willingness to drop $0.50. It's an easy to use, poly fabric and it has those big sleeves I like. I've seen bloggers like  Refashionista make things fit using nothing but a pin. I'm gonna use one, but I'm gonna need to get a lot more material off this dress. First...
As with most refashions, one must do the standard shoulder pad removal. I used my scissors to take off that mock turtleneck thing because I wanted to make it slightly v-neck.
Pinning the new neck, not even gonna be a rolled hem.
I made it a high-low dress, but oh so slightly. You all know how to do that, right? Fold it in half lengthwise and then mark how much you're taking off before cutting. That's what I do.
At the last minute, I decided I needed less sleeve, and rolling them wasn't doing it for me. I cut off some of the sleeves and didn't bother taking a picture.

First, I used a safety pin to test gathering the dress. It looked like that. Even though, I have plenty of brooches at my disposal, none of them seemed right. It had to be something kinda simple, but a good size. Here's the good news: a recent thrift haul that I haven't posted about yet has left me with many, many pin backs!
score
I can make many brooches or more sweater clips! I had these two silver shank back (that sounds funny to me) buttons with their shanks mysteriously broken off. This made them perfect for my idea.
Veering off, again; this post features...
Black nail polish in a bottle shaped like a skull with a top hat! OMG, I'm so badass. Picked it up at Sally's when I bought my hair color last month. Anyway, you don't need a step by step for the DIY brooch. Here's the image:
See? Two shankless buttons glued to a piece of felt, glued to a pin back. I know, that's some cutting edge DIY here. Here's the damn end results:
I really like how simple and comfy it looks. I'm like, "Oh, hey. Just a little scrap of fabric for a dress, ain't no thang. I just put my hair in a ponytail and wrapped this bandana around my head, instead of hair washing. I'm just casual."
That high-low coulda been much higher...but I love this thing. It's all about versatility. Not feeling the brooch? No big deal, I'll just rock this huge belt.
And a little cherry brooch, sorry, no close up.
Or, I could wear the bird necklace, whatever. That belt is too damn wide. How about just a black sash to take the waist in?
That necklace is a strawberry
 I'm just saying, I really like this thing. Next chilly day, I'm wearing this again. And, I'll try and recreate more of these drapey things.

Stay moody, folks (?)

Sunday, April 13, 2014

Paint it Black: shirt to kimono refashion

For this edition of April's "Paint it Black" series (in which I commemorate the spring weather by refashioning clothing in a color not usually associated with warm weather outfits) I make a kimono the hard way by cutting an old shirt down the middle. It might be considered a "ki-nono" (I'm sorry.) I think I got this appreciation for kimonos over the winter, when I picked up this one:
This sweet vintage "cranes flying" kimono is still available in my Etsy shop. It's $20. After taking those pictures, I really started to like the item. "This is really cool," I said, admiring my robe worn as a top. "Why aren't people wearing these? Then, I checked Pinterest.
They are wearing those. Have been for some time.
click and find sources


Yup, kimono like clothing everywhere. Boho stuff. It's not a recent trend, at all. For whatever reason, I got the idea that I could make my own out of an old too big dress or shirt. (Actually, sewing a kimono from scratch is painfully easy, according to the tutorials I've seen.) Here's the "before" shirt:
Vintage, XL, polyester, 70s style shirt. 
I just thought this pic was somewhat silly. Hi.
I was so excited, to start this. I figured it would be somewhat easy. First, I had to remove some of the stuff.
Those are the elastic parts of the sleeve cuffs. And the collar had to go, because these things don't have them.
Then, I had to cut it down the middle in front. I actually marked it with a ruler and one of those white pencils.
I took out the three buttons at the top, folded each side in a couple inches and pinned it up. I also, cut off several inches from the sleeves so they wouldn't be so long. I actually gave the sleeves little rolled cuffs. After sewing the raw edges, I was mostly done. This thing was pretty easy.

So easy that I look like a slack-jawed yokel.
It works. Now, all it needed was something to embellish it. I had several options in mind to make it fancier.
That feather, after surgically removing it from that stained t shirt.
Strawberries or that awesome peacock applique, or that kickass Greek key ribbon
Some pretty lace or I could stencil with a bleach pen!
No, no, no. Nothing seemed right. I might be able to use the peacock if I go back to Joann's Fabric and get the feather appliques that matched. This is what trips me up on every project, I'm so damn indecisive. Here it is, without embellishments.
High waist, zippered skinny pants; open toed maryjane heels; sequin rose tshirt
But wait! There's more!Not much though. This refashion is also includes a DIY that's mind numbingly simple and a refashion that really isn't.
Here's outfit with a black crop top, instead. Wanna know how to make a crop top? Step 1: take a top and "crop" it. (Wow, heavy sarcasm, here.) Of course, this wasn't a top at first, it was a dress. A cringe-inducing-ly age and body type inappropriate dress.
Before. Yikes.
I picked that up last winter while doing some Forever 21 clearance shopping. Upon returning home, I remembered that I wasn't 21 and worked in kindergarten, not as a hooker extra on Law and Order: SVU. Even more embarrassing than typing that last part out? I bought two of those dresses.
As you see, the tops of these low price garments have those cool boob compartments and awesome hook and closures down the middle. I just "cropped" off the too tight and short skirt part. Voila, now I've got sexy mini shirts to wear with high waist pants. One of these days.

OMG, you guys. This post still won't quit. Look at those tassel necklaces. I "made" them. Those quotation marks indicate insincerity with the word within them. Sorry no pics of the process, hope you can follow.
 That tassel from fabric store clearance + a medium length chain= this:
 Put tassel om chain. Wow, a Joanne's Fabric sale item necklace...I'm so boho that I'm playing bongos and writing poetry. Here's the other necklace. It has two smaller black tassels!
All sarcasm aside, I think I actually like my results and I want to make more of these. I've already got the fabric lined up for kimono from a pattern. Keep it simple, stupid.