wood back

Thursday, July 30, 2015

Short skirt and a loooong jacket

Actually, I don't have a short skirt. I just have the need to use song titles as post titles, in this case I'm doing Cake's Short Skirt Long Jacket By the way, this is another damn refashion post without the damn "before" picture. Also, it's a no-sew.
In the last post, I didn't intend to blog about the dress I tweaked, so I didn't bother taking a pic. In this case, I know damn well that I did get a shot of the original. I just don't have it any of my picture folders at the moment. How about a peek at another dress almost just like mine that I stole from an Etsy seller?
That frock is an exact replica of mine in blue instead of black. It's like that mannequin is wearing two dresses! Don't be fooled, you guys; it's one of those late 80s/early 90s two-articles-masquerading-as one. The white dress is just a lame crinkly panel down the middle.
I like the white on black flowery material and I liked the idea of having a long open dress like a duster as I've seen them called. This doesn't take a genius: lose the middle.
So, on a warm Friday evening, I relaxed on the couch and indulged in a frozen cocktail, the kind you freeze in a pouch. I did not want to use a seam ripper.

+

=

 
See that small little cut I accidentally made while trimming my dress? Mostly invisible and I have no regrets.
So, here's what it looks like:
LOL, with a quick edit job, I can show you a before picture:
another:
Just one more, with a pose...

Thursday, July 16, 2015

Take a Bow...blue dress and t shirt

By the way, that title says "take a bow," as in a tied up ribbon, something on top of a present, or that thing on Hello Kitty's head. 
This one isn't exactly exciting. In fact, let's just skip the intro and see the dress:
Yup, that's the end result. That's my finished dress. I wasn't planning on posting about it, so I neglected to take a "before" shot. It's a simple stretchy knit dress in a dark blue color that I really like. I must have liked this garment because I have two of them...
Here it is in black! For some reason, I'm holding the ends of those things that attached to its side that tie in the back. I love those, there has to be a name for them. I'm not exactly modest, but there was a slight over exposed feeling to this dress. It just doesn't seem right to stroll into a grocery store or the thrifts with one's boobs so brazenly on display. Call me old fashioned, but in my day, we only hauled our girls out at the mall or someplace like that ;)
I have a slight rule when it comes to summer clothes: Wear as few garments as possible. Don't layer, stick to one lightweight garment, preferably a dress. Summer school is not air conditioned.
I made the bust line higher with this:
That's a really cute t shirt with a black bow on it. Unfortunately, it has a bunch of letters and numbers on the back. Do not want. I'll just take the bow.
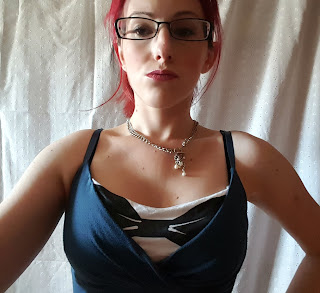
I sewed that t shirt scrap to the front and waved a sad goodbye to my best feature. For a closer look, here are some closeups I took using my brand new fancy phone. I pretty much never replace a phone until the one I'm using breaks. That's what happened in June and with the help of a loyalty program, this broke lady earned a lovely Galaxy S6. The camera has a great selfie mode and is so clear it shows every detail of my face. I'll just edit a few things...
A rare glasses pic! I am a full time glasses wearer, but I rarely wear them in pictures. I just don't think they photograph well.
That one's weird. That doesn't even look like the me I'm used to. But, how do ya like that dress fix? I like it.
The end.

Thursday, June 25, 2015

Little jacket refash

This is another refashion that I've been sitting on for a while for various reasons:
1.Once completed, I wasn't sure what to wear it with.
2. The weather turned warm and I didn't want to wear any jacket type things.
3. Got lazy and didn't want to go to the trouble of setting up my tripod and modeling.
Check out the item that I started with in all it's ridiculousness:
I picked it up at Savers for the strangely low price of $2.99. (They're a pricey thrift store.) It looked like a satiny, wind breaker type thing.For that flattering, extra pouffy look.  I really liked the print. My goal was to make a little jacket thing; a "bolero" is the word I think I'm looking for.
The ballooning, shiny material is corralled at the waist and elbows with elastic sections. The buttons at the top only go about halfway to the bottom, making this a pull over.
"Ooh, what happens next?!" you may be wondering. And I assure you that I did take photos of the process. You can pry them out of my cold, dead phone.
My previous phone is, what they call "bricked." It has died, taking with it the pictures of this process and more. So without any further ado; the after pics!
Doesn't it look pretty good? It came out pretty much just as I was expecting. Since this is a roomy, shapeless garment, I concluded that it should be balanced with tight clothes. I've got some very snug little pants on with a long black tank top.
I wanted to give a closer peek at how cute the print is. Tiny white flowers on an aqua background. Or popcorn, maybe.
If anyone wants to know how I made this thing, I can break it down for you. First, I removed those elastic-y things from the sleeves and waist. Then, I cut down the middle, removing the button placket (placket is a funny word). I hemmed the raw edges of the bottom and sleeves.
I pretty much did the same thing with the front sides. Like the other sections I had plenty of excess material to give it two nice thick folds. It sewed up quite nicely.
Does this cropped jacket make my thighs look wide? I kid. It was too warm and humid to wear this out after I took these pictures. I can't wait to actually wear it.

Saturday, June 20, 2015

lol "Art": the minimalist collage

When it comes to DIY projects, it's obvious that I rarely break a sweat with mine. In other words; I like 'em simple.
As I mentioned in one of my lengthy, dramatized stories, I have occasionally put together little works of art as gifts that I called minimalist collages. I shared the one that I made for Falcon, which looked like this:

As you see, it's basically a painted canvas with a word, and a picture of a leopard cut from an old book decoupaged on it. Definitely not what one would normally call a collage. The method behind this series was to choose an animal to represent the particular wrestling performer as well as an adjective used to describe him/her. Then do art.


I should backtrack...this one isn't the first I had made. The first was created (though not gifted) to a guy who wrestled as...let's just call him "CVZ." I don't want to point him out on the internets. Like many of my tales, this one is from that crazy summer of 2012. I had plenty of time on my hands and I was really getting into the arts and crafts. This dude was going through a pretty big life tragedy and had just moved into an apartment alone. I thought that maybe I should make him some wall art. AS A FRIEND. I mean, I had the materials laying around.
Anyway, I started with a bunch of pictures cut from old, tattered books that I had collected. My theme was the pompous, grandiose, dick character he played in WAW. I painted a canvas in blue (CVZ's color) and swirls of black and sparkles which actually came out quite nice. After trying to arrange my cutouts onto the painted canvas like one would a collage, it looked "meh." I took off everything but the drawing of a tiger from a book about drawing animals. I used some letter stickers to spell the word "awesome."
Of course, that time period was a roller coaster and when I completed this, I chose not to give it to him because I didn't want to look like a freak. I just checked to see if it was still under my couch...
Yes! There it is! It looked decidedly more "awesome" without the dust layer, but there you have it. Here's a little bit of "how to."
Gather materials. That picture is the beginning of Falcon's piece. I've got a canvas, some picture cutouts, letter stickers, paint brushes, and paint in the color of his wrestling tights. Not pictured: Mod Podge. You need that.
Let's jump way ahead. In April, I decided it was a good time to honor another of WAW's finest for his b-day. I present; Christian Sain.
The first thing I did was decide what animal I wanted to use. It wasn't an easy thing to pick, but once I decided on a cobra, I found it was the perfect choice. The cobra is the snake known for its hood around its head which it flares out when ready to strike, like the showy entrance pose of a wrestler making his way to the ring. Their sinewy, graceful movement with great speed brings to mind many of Christian Sain's great matches. Basically: the cobra is an aggressive, deadly snake with a loud hiss and some with the ability to spit venom; yet they move along gracefully and regally, like royalty. An easy comparison to Chris.
I was happy to have the chance to pull out my stash of supplies:
Those Walter T. Foster "how to draw" books were only $0.99. Here's some of the stuff in my suitcase:
stamps and stickers!
a bunch of awesome stencils!
More stickers and some little rub on letters!
Oh, guess what? I couldn't find a single decent image of a cobra in any of many children's encyclopedias or science books. I was going to have to draw my own! But first, the background.

I started with two colors; silver and gold. These were the colors of our wrestling attire when we were a team. Silver and black mostly, but for a short time gold and black. I wanted to make a hypnotic swirly background.

It looked pretty nice after using many layers of paint, but I guess I couldn't leave well enough alone. I added black.
For whatever reason, I really liked my swirl. Ooh, look up close:
Using white paper and a pencil, I found a one of those step-by-step-how-to-draw sites and picked a nice little snake. Once completed, I cut him from the white paper and adhered it to a piece of silver paper.
Hellooooo
Now for the descriptive word. I probably should have used "glorious" but the one I had been kicking around was "unrepentant." Like: "the villain was unrepentant of the damage he had done, as he strutted off in the act of giving no fucks at all." Perfect for a heel wrestler. What sucks? Long word and a small picture.
I picked the letters that I thought matched best and rearranged them and the snake all over the board, eventually deciding on the diagonal letters. Using Mod Podge, I painted the back of my cobra drawing and pressed it onto the canvas, flattening it out to ensure there were no bubbles. After an hour, I gave the whole thing a top coat of Mod Podge and let that dry. Then I glue gunned those cardboard letters in place. Like the other two I showed you, I included some studs to toughen it up. Finally:
There it is! My birthday gift to Chris!

Thursday, May 28, 2015

She works hard for the money


I love the end of that video where all those hard working women come together for a choreographed dance number in the street.
I've been working hard and neglecting to share some of the fruits of my labor. That doesn't seem right...the fruits would be the money I worked hard for, not the pictures of my treasures, which is what I'm sharing with you. It's gonna be a work/office themed post!
I took that picture of a somewhat recent haul from the Goodwill Outlet. I was so pleased with my very cheaply scored findings that when I got home I laid it all out for a photo to commemorate my success. Do you see the quality vintage slips (for under dresses) hanging on the left? On top of that great blue train case is a bag of puzzle pieces from a fabulous mid century puzzle of the United States. The pieces were scattered through the bin, and I scooped each one up, bringing it home with faith that all states were accounted for. Nope. They were not. That picture doesn't even show my favorite find of that day. Behold:
buy it here!
That amazing gown which might actually be handmade was somehow relegated to the depths of a Goodwill Outlet bin. Like some eager archaeologist, I stood amazed at this unexpected treasure as I slowly uncovered it from under a layer of old clothing and blankets. It's awesome and it's in excellent condition.
I'm showing an old prom gown after I just said that I was doing an office theme. Typical. Back on  track, I would like to introduce some of my many recent finds for the office or workshop.
  Cool, retro-looking metal thing for your paintbrushes, pens, or whatevs

Really cool 3 ring binder. Not as useful as it was in its time, but aesthetically pleasing!

Faux bois/ fake wood grain metal bookends! I already sold those things. Of course, it wouldn't be a thrift share post without the cheap plug. You can find items like these in the office, sewing, miscellaneous section of my Etsy shop!
If you look at that table of stuff I pictured up there, you'll see not one; but two vintage desk lamps. Well now I have three vintage desk lamps.

And guess what? Two of them were revamps! I'm not actually that excited as I seem with my exclamation points. But, check out what I did.
There's that weird little indent on the base. WTF is that? The next time I was at Walmart--I mean local, independent, small business store--I looked in the cheap-ass toy section and grabbed little pack of plastic animals and trees. $2, and I can already think of ways that I plan on using the rest of the pieces. Glue gunned that cheapo tree to the lamp base and the spot is gone.
That little globe bank is featured as a staging prop for many many listings. How do you feel about the tree lamp? 
I neglected to get a "before" pic of my next item, so let me paint you a mental image. There is a flat metal area on the base of this lamp where the on/off switch is located. It looked kinda scraped up and where it read "lo" and "hi" were both pretty worn out. Easy upgrade; shelf liner paper and Mod Podge. 
If you look close enough, you can see the design on that paper...faux bois. Long live cheesy, fake wood grain! I put these in the apartment section of my shop, Sweet Scores Vintage. Ya know, to keep them with my many other lamps. 
Tune in one of these days to find out how I manage to fix this fail:
Oh, Goodwill...I'm calling you out on this. A great mid century clock that sells for a decent amount on Etsy and you chose to protect the price sticker with packing tape. I direct your attention to the lower left corner and you see the damage done to the veneer(?) by this tape which could've easily been applied to the back side. If I zoomed out on this picture you would see my hair dryer that I used to carefully heat up the tape during the pulling process to aid in its removal. It was no use. 
There's like, a whole damn thing with this clock. I'm going to continue with its renovation because of the sunk cost fallacy.

Thursday, May 21, 2015

Belt buckle transplants and a really awesome dress

I really like belts and currently own several tons of them. In fact, one of my nifty little belt/scarf closet hangers just broke from the weight. When it comes to this particular item, I'm mostly talking about the waist-cinching style. Those thick elastic ones that don't hold your pants up, but do help to create an hourglass figure and draw attention to your best feature. Well, my fave feature. So, look at this slightly tacky but necessary for my wardrobe belt:
Ooh, it's a large, blue bird...birds again?! Yeah birds. I got that at Savers awhile back for $2. Anyway the white belt may have worked ok: it didn't look terrible. It was a little dingy, though. No prob, I'll just remove the belt buckle and put it on a more practical belt. Here's one:
There they are, side by side. That black belt had an interesting...texture? It also had a dated knot glued to the belt buckle that I could do without. So, I removed both belt buckles from their elastic belts. Then I gave that black one the bird (te he).
That works!Yea, black with blue bird belt. And then...
I have this green belt with an ugly, 80s, snakeskin looking, double circle buckle. Another transplant. I easily separated those round things from the belt. Now, to find a better buckle.
I just happened to have a spare one; the outdated knot piece that I removed from that black belt. Luckily, the fabric knot was held on with glue, which I ripped right off. This left the hook hardware that I needed. Unfortunately, it didn't match so well with the other end which it would hook into. Easy solution: glue something on it. I have many buttons. I would glue a button on.
As you see, it's a brown buckle and not black and I like black. I think that button was just the best flat and fitting one, and rather than being picky about color, I fired up the glue gun. Wait. I got more.
Look at that cool fancy, old-timey buckle. And yes, all of these "before" pics were taken at night, so they look bad. I don't care much for the quality of the "before" shots. I find that buckle quite striking and I love how it attaches together at the center. The belt itself is kinda lame. It's like a regular elastic piece covered in some saggy, scrunched up casing.
I could either amputate the whole piece from the fancy buckle or rip it open, exposing the unseen elastic underneath.
Or I could do that. I just stretched the aqua material. I removed one side of the buckle and pulled the casing part until it was tight around the elastic part. I cut off the excess, sewed the raw edge and then resewed the buckle back on. That was one easy refashion.
Want to see these pieces at work? I'm not really asking, my vain self already got some outfit pics. I will now take the opportunity to show off an incredible thrift store dress find.
Look at that. Do you know what that is? Well, it's a 40s inspired, black and white, polka dot dress from the clothing label called Stop Staring. It fits perfectly! No alterations needed. I just Googled image searched and didn't see any pics of my dress. It's a really cool label featuring beautiful clothing that costs an arm and an ass. ( I wanted to make it an alliteration.) Really; click the link and get a look at them highfalutin' rich folk prices. Or look at me!
Thrift purists may scoff at the standard $6 price for dresses, but as I twirl around in this, I'm reminded that you can sometimes find something well worth 5 bucks and some change (with the Goodwill discount card.)
Here's the green belt:
I turned the floor standing fan on, as it was a warm afternoon. Got a little windblown effect going. The fancy buckle aqua belt didn't match polka dot dress. So I threw on something from my closet.
Oh, this old thing? I just pull this disco dress out, slap on some makeup, and pose in front of a fan with it. Then I hang it back up.
Thanks for looking and not leaving snarky comments!